Wednesday, November 21, 2018

State Minimum Wage Increases for 2019 (Map) from BLR.com

Minimum wage increases will affect numerous states across the country in January 2019.
Under the Fair Labor Standards Act (FLSA), the current federal minimum wage is $7.25 per hour, but the FLSA does not supersede any state or local laws that are more favorable to employees. Therefore, if a state or municipality has a minimum wage that is higher than the federal minimum, employers subject to the state or local minimum wage law are obligated to pay the higher rate to employees working there. The minimum wage for federal contractors in 2019 is $10.60 per hour.
The map below shows the states that are increasing their minimum wages, including the new rates and amounts of the increases as of the date of publication of this article. We also provide a listing of the states increasing their minimum wages and the effective dates of the changes below the map.

State Minimum Wage Changes Effective December 31, 2018

New York: New York City (NYC) large employers (11 or more) $15.00. NYC small employers (10 or fewer) $13.50; increasing to $15 12/31/19.
Long Island and Westchester $12.00; increasing to $13.00 12/31/19; $14.00 12/31/20; $15.00 12/31/21.
Remainder of New York state $11.10; increasing to $11.80 12/31/19; $12.50 12/31/20. Annual increases for the remainder of New York state will continue until the rate reaches $15 per hour, then the rate will increase on an annual basis.
Fast food employees in NYC $15.00. Fast food employees outside NYC $12.75; increasing to: $13.75 12/31/19; $14.50 12/31/20; $15.00 7/1/21.

State Minimum Wage Changes Effective January 1, 2019

Alaska: $9.89 per hour.
Arizona: $11.00 per hour. Increasing to: $12.00 1/1/20. Local laws may require different minimum wage rates.
Arkansas: $9.25 per hour. Increasing to: $10.00 1/1/20; $11.00 1/1/21.
California: $12.00 per hour with 26 employees or more; $11.00 per hour with fewer than 26 employees. There are scheduled future increases. For 26 employees or more the minimum wage rate is increasing to: $13.00 1/1/20; $14.00 1/1/21; $15.00 1/1/22. For 25 employees or less the minimum wage rate is increasing to: $12.00 1/1/20; $13.00 1/1/21; $14.00 1/1/22; $15.00 1/1/23. Local laws may require different minimum wage rates.
Colorado: $11.10 per hour. Increasing to: $12.00 1/1/20.
Florida: $8.46 per hour.
Maine: $11.00 per hour. Increasing to: $12.00 1/1/20. Local laws may require different minimum wage rates.
Massachusetts: $12.00 per hour. Increasing to: $12.75 1/1/20; $13.50 1/1/21; $14.25 1/1/22; $15.00 1/1/25.
Minnesota: $9.86 per hour for large employers (annual gross revenue of $500,000 or more); $8.04 per hour for small employers (annual gross revenue of less than $500,000). Local laws may require different minimum wage rates.
Missouri: $8.60 per hour. Increasing to: $9.45 1/1/20; $10.30 1/1/21; $11.15 1/1/22; $12.00 1/1/23.
Montana: $8.50 per hour.
New Jersey: $8.85 per hour.
Ohio: $8.55 per hour (gross receipts of $314,000 or more); $7.25 per hour (gross receipts less than $314,000).
Rhode Island: $10.50 per hour.
South Dakota: $9.10 per hour.
Vermont: $10.78 per hour.
Washington: $12.00 per hour. Increasing to: $13.50 1/1/20. Local laws may require different minimum wage rates.

State Minimum Wage Changes Effective July 1, 2019

D.C.: $14.00 per hour on 7/1/19. Increasing to: $15.00 7/1/20.
Oregon: $12.50 Portland metro area; $11.25 urban counties; $11.00 rural counties on 7/1/19. The Portland metro area will increase to $13.25 7/1/20; $14.00 7/1/21; $14.75 7/1/22. The urban counties will increase to $12.00 7/1/20; $12.75 7/1/21; $13.50 7/1/22. The rural counties will increase to $11.50 7/1/20; $12.00 7/1/21; $12.50 7/1/22.

State Minimum Wage Changes Effective October 1, 2019

Delaware: $9.25 per hour on 10/1/19. Increasing to: $9.75 10/1/20, $10.25 10/1/21.

Minimum Wage Basics

The federal FLSA requires that a minimum wage be paid for all hours an employee is “suffered or permitted” to work for the employer (29 U.S.C. §203(g)) and that an overtime wage be paid for all hours “worked” over 40 in a week. The FLSA does not specifically define “hours worked” or place a limit on the number of hours an employee may work; it requires only that overtime be paid for any hours worked over 40.
Determining exactly what constitutes hours worked is essential in determining an employee’s compensation and compliance with both minimum wage and overtime requirements of the act.
Hours worked includes time during which an employee is “necessarily required to be on the employer’s premises, on duty or at a prescribed work place” (29 C.F.R. §785.7). This broad definition of hours worked may require that an employee be compensated for time the employer does not otherwise consider working time, such as travel time, waiting time and certain meal, rest and sleep periods, and time the employee is required to spend in training, at seminars, or in meetings.
The courts and the U.S. Department of Labor, however, have developed a de minimis rule, whereby employers may disregard insubstantial or insignificant periods of time beyond the scheduled working hours, if, as a practical administrative matter, such time cannot be precisely recorded.
If employees are checking e-mails for 2 or 3 minutes, employers will likely not have to pay for this time. But if employees are spending 10 to 15 minutes after work hours, employers will have to pay employees for this work time. Also, the FLSA explicitly permits the rounding of an employee’s start and stop times.
Hours worked for purposes of the FLSA does not include time spent on call, time spent waiting to work, or time when an employee is required to carry a pager or cell phone, provided the employee is otherwise free to effectively use the time for his or her own personal purposes. The FLSA does not obligate employers to pay employees for holidays, vacation, or sick days.
The rules are strict, but the penalties are stricter. Paying employees properly now will help you to avoid expensive fines, claims, and lawsuits down the line.
Article courtesy of www.blm.com
 HCSI


Thursday, October 25, 2018

Preparing Your Practice For Emergencies and Disasters: The Risk Assesment

A crucial step in preparedness for your practice in the even of a emergency or disaster is a Risk Assessment. 
A risk assessment is a process to identify potential hazards and analyze what could happen if a hazard occurs. A business impact analysis (BIA) is the process for determining the potential impacts resulting from the interruption of time sensitive or critical business processes.


As an employer, make sure your workplace has a building evacuation plan that is regularly practiced. The preparedness program is built on a foundation of management leadership, commitment and financial support. Without management commitment and financial support, it will be difficult to build the program, maintain resources and keep the program up-to-date.
Implementation
Write a preparedness plan addressing:
  • Resource management
  • Emergency response
  • Crisis communications
  • Business continuity
  • Information technology
  • Records Managment
  • Employee assistance
  • Incident management
  • Training
Find more information on Implementation here.
Testing And Exercises
  • Test and evaluate your plan
  • Define different types of exercises
  • Learn how to conduct exercises
  • Use exercise results to evaluate the effectiveness of the plan
Find more information on Testing and Exercises here.
Program Improvement
  • Identify when the preparedness program needs to be reviewed
  • Discover methods to evaluate the preparedness program
  • Utilize the review to make necessary changes and plan improvements
Find more information on Program Improvement here.
Visit the Deparment of Homeland Securities Business site for more information.
  • Take a critical look at your heating, ventilation and air conditioning system to determine if it is secure or if it could feasibly be upgraded to better filter potential contaminants, and be sure you know how to turn it off if you need to.
  • Think about what to do if your employees can't go home.
  • Make sure you have appropriate supplies on hand.
  • Read more at Build a Kit and Staying Put.
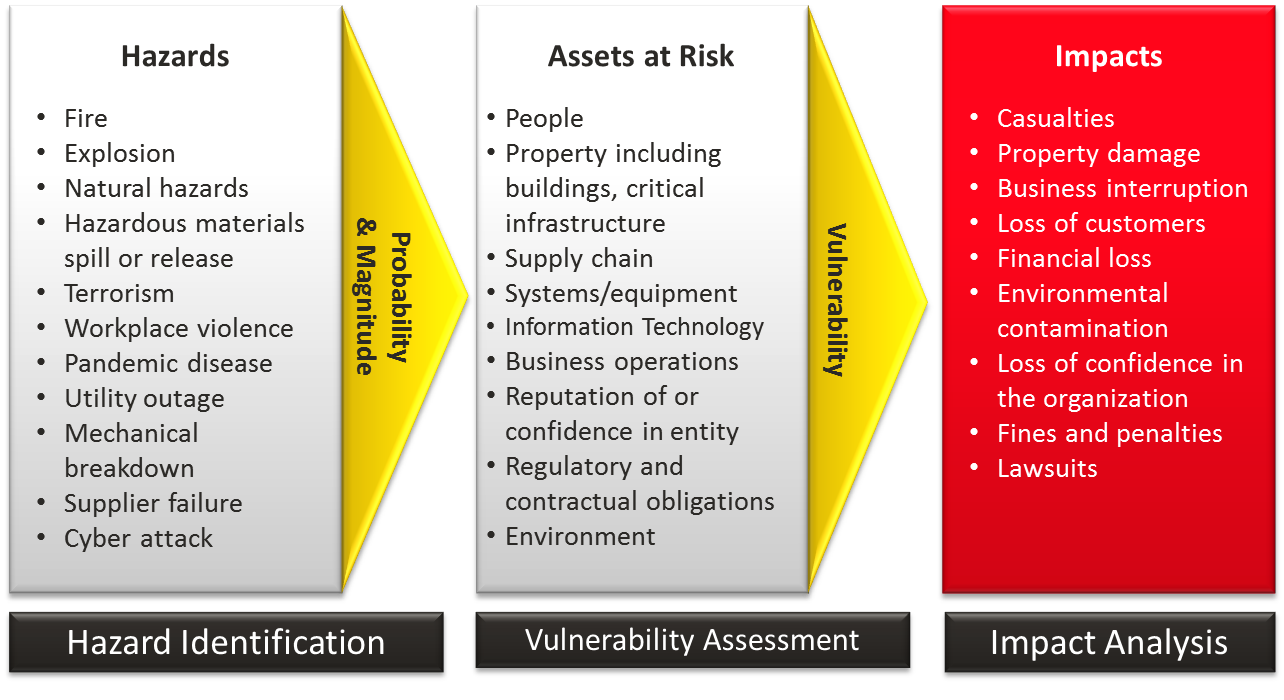
There are numerous hazards to consider. For each hazard there are many possible scenarios that could unfold depending on timing, magnitude and location of the hazard. Consider hurricanes for an example. A Hurricane forecast to make landfall near your business could change direction and go out to sea. The storm could intensify into a major hurricane and make landfall.

There are many “assets” at risk from hazards. First and foremost, injuries to people should be the first consideration of the risk assessment. Hazard scenarios that could cause significant injuries should be highlighted to ensure that appropriate emergency plans are in place. Many other physical assets may be at risk. These include buildings, information technology, utility systems, machinery, raw materials and patient records. The potential for environmental impact should also be considered. Consider the impact an incident could have on your relationships with customers, the surrounding community and other stakeholders. Consider situations that would cause patients to lose confidence in your organization and its services or protection of vital records.
As you conduct the risk assessment, look for vulnerabilities—weaknesses—that would make an asset more susceptible to damage from a hazard. Vulnerabilities include deficiencies in building construction, process systems, security, protection systems and loss prevention programs. They contribute to the severity of damage when an incident occurs. For example, a building without a fire sprinkler system could burn to the ground while a building with a properly designed, installed and maintained fire sprinkler system would suffer limited fire damage.
The impacts from hazards can be reduced by investing in mitigation. If there is a potential for significant impacts, then creating a mitigation strategy should be a high priority.
Risk Assesment process diagram
Use the FEMA Risk Assessment Tool to complete your risk assessment. Instructions are provided on the form.

Please also request the supplementary and supportive HCSI HIPPA Security Risk Analysis health checkup checklist to coincide with your office risk assessment or by clicking here HCSI Support - Risk Anlysis or entering your email address in the top right side of the blog.
 HCSI
Source(s): http://www.hcsiinc.com, https://www.ready.gov/, http://www.fema.gov/

To subscribe to this blog, enter your email address:


Delivered by FeedBurner

The Importance in Healthcare of a Disaster Recovery Plan (DRP) and how to Organize your Risk Analysis into an actionable DRP.

Creating Your Healthcare Disaster Recovery Plan and Best Practices

When a covered entity performs a Security Risk Analysis, this is not the end but a begging to your HIPAA Security procedures and business continuity plan.

Information gained from the risk analysis then needs to further be organized into a tangible, well documented and actionable Disaster Recovery Plan (DRP).

All health care organizations (particularly hospitals and emergency care centers), must maintain a high degree of system and network availability. Patient's lives may depend on systems being up and running, and a patient's health could be jeopardized or negatively impacted by lack of access to health care data in the event of system downtime. 

The disaster recovery plan is a required implementation, defined within the HIPAA Contingency Plan standard in the Administrative Safeguards section of the HIPAA Security Rule. The Rule calls for HIPAA-compliant organizations to anticipate how natural or other disasters could damage systems that contain electronic health information and to develop policies and procedures for responding to such situations.

A HIPAA-compliant disaster recovery plan must state how operations will be conducted in an emergency situation and which workforce members are responsible for carrying out those operations. The plan must also explain how data will be safeguarded or moved without violating HIPAA standards for Privacy and Security.  It must also explain how confidential data and safeguards for that data will be restored.  Although HIPAA doesn't specify exactly how to do this, it does note that failure to adequately recover from a disaster could lead to noncompliance. Failure to comply exposes officers of the organization to repercussions, such as fines or possible jail time.

Unfortunately, when establishing IT budgets, many health care practices and organizations overlook the importance of developing a meaningful, functional and standardized disaster recovery plan. It's important for health care practice Administrators, Compliance Officers and CIOs to make the necessary business case model and receive a useful budget for disaster recovery planning. Making use of the, pay $10 now or $10,000 later, theorem comes to mind.
Formulating a detailed disaster recovery plan should be a primary objective of the entire practice and IT disaster recovery planning project. It is in these plans that you will set out the detailed steps needed to recover your IT EMR systems to a state in which they can support the practice (during, if necessary) and after a disaster.
But before you can create a detailed recovery plan, you will need to perform a Risk Analysis/Assessment (RA) to identify the IT services that support the organization’s critical business activities.
The next step is to establish recovery time objectives (RTOs)* and recovery point objectives (RPOs)**.
*The recovery time objective (RTO) is the targeted duration of time and a service level within which a business process must be restored after a disaster (or disruption) in order to avoid unacceptable consequences associated with a break in business continuity. It can include the time for trying to fix the problem without a recovery, the recovery itself, testing, and the communication to the users.
**A recovery point objective (RPO) is defined by business continuity planning. It is the maximum targeted period in which data might be lost from an IT service due to a major incident.
Now that you have that basic information gathering stage compiled, you can move on to the next stage.
Developing Disaster Recovery Strategies
ISO/IEC 27031, which is the global standard for IT disaster recovery, states, “Strategies should define the approaches to implement the required resilience so that the principles of incident prevention, detection, response, recovery and restoration are put in place.” Strategies define what you plan to do when responding to an incident, while plans describe how you will do it.
Once you have identified your critical systems, RTOs, RPOs, etc, create a table, similar to what is shown below, to help you formulate the disaster recovery strategies you will use to protect them.
Critical System(s)
RTO/RPO
Threat
Prevention Strategy
Response Strategy
Recovery Strategy
EMR System
6 hours/
3 hours
Server Failure/Loss of ePHI
Secure server room; UPS; Regularly backup server
Verify UPS running time, use backup server
Restore/replace primary sever; restore backup date  and input interim records
Accounts Payable/
Billing
8 hours/
4 hours
Server Failure/Loss of Billing records
Secure equipment room; UPS; Regularly backup server
Maintain paper records for later recovery
Restore/replace primary sever; restore backup date  and input interim records
Building Security
4 hours/
2 hours
Security System Destroyed
Place system in secure location; UPS; Use protective enclosures for sensors and cameras
Deploy security is available, secure and/or relocate vital system/ records
Repair/Replace security unit and devices
Table 1: Determining disaster recovery Strategies.
Remember to consider issues such as billing, budgets, management’s position with regard to risks, the availability of resources, costs versus benefits, human constraints, technological constraints and regulatory obligations.
Now let’s examine some additional factors in strategy definition:
People

This involves availability of staff/contractors, training needs of staff/contractors, duplication of critical skills so there can be a primary and at least one backup person, available documentation to be used by staff, and follow-up (ongoing training) to ensure staff and contractor retention of knowledge.

Physical facilities

Areas to look at are availability of alternate work areas within the same site, at a different company location, at a third-party-provided location, at employees’ homes or at a transportable work facility. Then consider site security, staff access procedures, ID badges and the location of the alternate space relative to the primary site.

Technology

You’ll need to consider access to equipment space that is properly configured for IT systems, with raised floors, for example; suitable heating, ventilation and air conditioning (HVAC) for IT systems; sufficient primary electrical power; suitable voice and data infrastructure; the distance of the alternate technology area from the primary site; provision for staffing at an alternate technology site; availability of failover (to a secondary server of backup system for example) and failback (returning to normal operations) technologies to facilitate recovery; support for legacy systems; and physical and information security capabilities at the alternate site.
Data
Areas to look at include timely backup of critical data to a secure storage area in accordance with RTO/RPO requirements, method(s) of data storage (cloud, disk, tape, optical, etc), connectivity and bandwidth requirements to ensure all critical data can be backed up in accordance with RTO/RPO time scales, data protection capabilities at the alternate storage site, and availability of technical support from qualified third-party service providers.
Suppliers
You’ll need to identify and contract with primary and alternate suppliers, (including all Business Associates), for all critical systems, PHI data and processes, and even the sourcing of specific crucial people. Key areas where alternate suppliers will be important include hardware (such as servers, racks, etc), power (such as batteries, universal power supplies, power protection, etc), networks (voice and data network services), repair and replacement of components, and multiple delivery firms (FedEx, UPS, etc.).
Policies and procedures
Define policies and procedures describing your Disaster Recovery Plan and have them approved by senior management and Compliance Officer(s). Then define the step-by-step procedures to (for example) initiate data backup to secure alternate locations, relocate operations to an alternate space, recover systems and data at the alternate sites, and resume operations at either the original site or at a new location.
Be sure to obtain management sign-off for your strategies and be prepared to demonstrate that your strategies support the practices’ business and compliance goals.
Translating disaster recovery strategies into DR plans
Once your disaster recovery strategies have been developed, you’re ready to translate them into disaster recovery plans. Let’s take Table 1 and recast it into Table 2, seen below. Here we can see the critical system and associated threat, the response strategy and (new) response action steps, as well as the recovery strategy and (new) recovery action steps. This approach can help you quickly drill down and define high-level action steps.
Critical System(s)
Threat
Response Strategy
Response Action Steps
Recovery Strategy
Recovery Action Steps
EMR System
Server Failure/ Loss of ePHI
Switch over to backup server; create paper records
Confirm status of Server; Verify Data has been backed up including testing and restoring; Switch over to alternate server
Restore/replace primary sever; restore backup date  and input interim records
Verify primary system integrity and repair/replace if necessary; restore backups; incorporate offline records; fall back from secondary servers
Accounts Payable/
Billing
Server Failure/Loss of Billing info
Switch over to backup server; create paper records
Confirm status of Server; Verify Data has been backed up including testing and restoring; Switch over to alternate server
Restore/replace primary sever; restore backup date  and input interim records
Verify primary system integrity and repair/replace if necessary; restore backups; incorporate offline billing or accounting information; fall back from secondary servers
Building Security
Security System Destroyed
Deploy guards and/or secure server records room.
Verify status of security system and video storage; Organize guards and define duties;  have available alternative communication methods (2-way radio)
Obtain or re-install new system/sensors, etc.
Contact vendor to identify system failure issues and repair/replace any faulty components.
Table 2: Using strategies to create disaster recovery Plan.
From Table 2 (above) you can expand the high-level steps into more detailed step-by-step procedures, as you deem necessary. Be sure they are organized and linked in the proper sequence.
Developing DR plans
DR plans provide a step-by-step process for responding to a disruptive event. Procedures should ensure an easy-to-use and repeatable process for recovering damaged IT and ePHI assets then returning these hardware items and critical data back to normal operation as quickly as possible. If staff relocation to a third-party “hot site” or other alternate space is necessary, procedures must be developed for those possible scenarios.
Incident response
In addition, IT disaster recovery plans should be an inclusive part of an incident or emergency response plan that addresses the initial stages of the situation and the steps to be taken.
Note: Emergency management activities that may be needed to address situations where humans are injured or situations such as fires may be a concern must be addressed by local fire departments and/or other first responders.
The DR plan structure
The following section details the elements in a DR plan in the sequence defined by ISO 27031 and ISO 24762.
Important note: Best practice DR plans should begin with a few pages that summarize key action steps (such as where to assemble employees if forced to evacuate the building) and lists of key contacts and their contact information for ease of coordinating, authorizing and launching the plan.
  1. Introduction.  Following the initial emergency pages, DR plans have an introduction that includes the purpose and scope of the plan. This section should specify who has approved the plan, those who are authorized to activate it and a list of linkages to other relevant plans and documents.
  2. Roles and responsibilities. The next section should define roles and responsibilities of DR recovery team members, their contact details, spending limits (for example, if equipment has to be purchased) and the limits of their authority in a disaster situation.
  3. Incident response. During the incident response process, we typically become aware of an out-of-normal situation (such as being alerted by various system-level alarms), quickly assess the situation (and any damage) to make an early determination of its severity, attempt to contain the incident and bring it under control, and notify management and other key stakeholders.
  4. Plan activation. Based on the findings from incident response activities, the next step is to determine if disaster recovery plans should be launched, and which ones in particular should be invoked. If DR plans are to be invoked, incident response activities can be scaled back or terminated, depending on the incident, allowing for launch of the DR plans. This section defines the criteria for launching the plan, what data is needed and who makes the determination. Included within this part of the plan should be assembly areas for staff (primary and alternates), procedures for notifying and activating DR team members, and procedures for standing down the plan if management determines the DR plan response is not needed.
  5. Document history. A section on plan document dates and revisions is essential, and should include dates of revisions, what was revised and who approved the revisions. This can be located at the front of the plan document.
  6. Procedures. Once the plan has been launched, DR teams take the materials assigned to them and proceed with response and recovery activities as specified in the plans. The more detailed the plan is, the more likely the affected IT asset will be recovered and returned to normal operation. Technology DR plans can be enhanced with relevant recovery information and procedures obtained from system vendors. Check with your vendors while developing your DR plans to see what they have in terms of emergency recovery documentation.
  7. Appendixes. Located at the end of the plan, these can include systems inventories, hardware logs, software license keys, Insurance policies and/or agent contacts, application inventories, network asset inventories, contracts and service-level agreements, supplier contact data, and any additional documentation that will facilitate recovery.
Additional follow up activities:
Once your DR plans have been completed, they are ready to be exercised and most importantly, TESTED.
Don't neglect DRP testing, modification and critical system updates.
This Identifies most of the critical components of any DRP needed to respond to HIPAA disaster recovery requirements. Although not discussed above, addressable policies could be dealt with inside or outside the DRP. Nonetheless, as ePHI applications can be added to, deleted or modified, periodic planed tests and resultant corrections are vital to the continuing success of any HIPAA disaster recovery plan while supporting regulatory requirements. 
This process, along with controlled testing, will serve to verify and determine whether recovery, fail-over and restoration processes with records and IT assets function as planned.
In parallel to these activities are these additional and necessary supplementary requirements:
Create and implement employee awareness training, documented policies and records management procedures. These are essential in that they ensure employees are fully aware of DR plans and their responsibilities in a disaster, and DR team members have been trained in their roles and responsibilities as defined in the plans. And since DR planning generates a significant amount of documentation, records management (and change management) activities should also be initiated. If your organization already has records management or process management implementation and change management programs, incorporate them in your DR planning.
With natural disasters, security breaches (external and internal) along with cyber attacks occurring more and more frequently, the need for a practicable DRP is more essential than ever. In fact, having a viable DRP is something all covered entities and supporting Business Associates should have in place for their own business integrity and survival along with patient record and health data integrity, regardless of HIPAA or other governmental regulatory disaster recovery requirements.
 HCSI
Note: When developing your IT/EMR DR plans, be sure to review the global standards ISO/IEC 24762 for disaster recovery and ISO/IEC 27035 (formerly ISO 18044) for incident response activities.

To subscribe to this blog, enter your email address:


Delivered by FeedBurner